Pages

Wednesday, April 29, 2015

Captain America Cosplay - The Night Before Ultron

Well, all my freaking out over this costume was definitely warranted. I'm literally still working on the final touches right now (8:30pm, on the 29th) -- finishing the shield harness, doing some extra work on the knee pads, altering the gloves I bought on Monday... oh and hemming the bodice (I'm dreading that, for some reason or other...) BUT, don't worry, because those are all that's left to do before I'm all set for a photo shoot and seeing Avengers: Age of Ultron tomorrow.

IT'S TOMORROW, GUYS. *FLAILS*

Okay, no joke, I've been getting that feeling of excitement in the pit of my stomach and chills running up my back all. stinking. day. It's kind of ridiculous. It happens whenever I imagine something cool, or think about the itinerary of the day, or during pretty much the entire time I was listening to the soundtrack for the movie. So weird, but I'm come to accept it as part of the fangirl life. ;D

So sorry for the mini fangirl sesh, but now it really is time to get into some hopefully quick and dirty progress reports, with tons of pics, on this ALMOST COMPLETED costume. :D

Pants:

In a moment of genius, the pants got upgraded. They now feature red stripes down the side of the thighs and knee pads with red accent stitching, to emulate a bit of the look of Cap's actual pants (while avoiding some of the, imho, frumpiness). The details really helped the look of the pants, so now they're not boring. ;)

(Sorry, no full picture of the pants to share... I can't give the whole costume away, right?? ;D)


Guantlets:

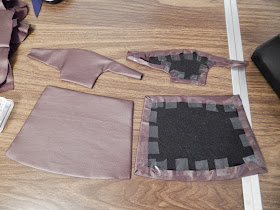
For all the leather parts of this costume, I overlaid upholstery leather (left over from my Tauriel costume) with the new apparel leather I bought for the costume (which is kind of gorgeous, really). Though this ended up looking quite nice, it was a complete pain in the neck to actually sew and deal with. Not only did it take forever to prepare all the pieces for sewing, the process of sewing itself also was crazy. Like I said in my previous post, my machine hated sewing so many layers of leather, and especially the delicate and slippery apparel leather. But no matter - with God's help, I got it done.

As for the actual guantlets, I just made up the design through a bit of trial and error, added a bit of decorative stitching, and used short lengths of elastic for the closures, with the first piece connected with velcro, so I can properly get my hand through. ;) I'll be wearing the gloves, that I'm currently altering to be fingerless and a darker color brown, underneath these.


Bodice:

Not too much different here, just finished the ab stripes, collar, and added the star and details surrounding.

I backed the star I made from a sheet of aluminum with craft foam, to make the back flat, so that I could then attach velcro triangles to each of the points for attaching the star to the bodice. I was originally going to sew it to the bodice, but I figured the velcro would work better and be faster to do -- and I was right. ;)


Belt and harness hardware:

This was the funnest and easiest part of making this costume: spray painting the belt buckle, and tri-glides + buckle thing for the harness. Hah! ;D No, but really -- I'd actually never used spray paint before in my life. Let me tell you, the stuff is magical. Totes my new BFF.

Before...
Not-so-secret weapon...
And after!!
It's actually not as big as it looks, but it really was almost perfect for the back harness buckle!
Belt:

Fairly simple build here: just drafted up a quick pattern, cut all the leather pieces out, sewing, then adding the buckle with extra leather strips. But, I am seriously SO bummed that I didn't have time to make the utility pouches to go with it!!! The belt still works without them, (and makes for a surprisingly nice, sleek look) but still... it would have been so good to have them. But, can't do everything, right? :P


And lastly, the shield harness:

This was a bit complicated, just figuring out the right shape and all, plus sewing all the pieces was crazy annoying... and it's not even finished yet. I'm taking a very extended break from finishing it to write this (I CAN ONLY TAKE SO MUCH AT ONCE. xD)... but only have to sew extra strips of leather with the tri-gliders to the base harness, so that should be pretty simple.


And that... is... a... WRAP on the creation of my Captain America cosplay! I hope you enjoyed watching the progress, and I am so excited to share with you pictures of the final product as my first post for May.

How are you guys' costumes for Age of Ultron (if you're wearing one!) coming along?? Who's seeing it this weekend??? AND WHO'S EXCITED????? :D :D

Saturday, April 25, 2015

Life Currently: Finals and Cap Cosplay

Disjointed post today, just a bunch of stuff that's going on in my life as of right now. I should probably be doing other things than writing this post, but I got a semi-lot amount of work done on Cap today, so I'm disillusioning myself into thinking I deserve a break. ;D

My life currently:

...trying on the Captain America costume is becoming a daily occurrence now, as I near the beginning of the end... IT'S COMING TOGETHER SO WELL AND I MIGHT CRY CAUSE IT'S SO BEAUTIFUL. Oh, not bragging -- celebrating. Those the five hundred thousand hours I spent on this thing are actually paying off a bit.

...during this time of finals and leading up to Age of Ultron, eating and sleeping are optional as I make the most of the 24 hours in a day. School, sadly, is not optional, so I've worked out a system: homeschool in the morning, costume in the afternoon and early evening, and whatever is left is devoted to homework for the dual-enrolled English class I'm taking. So far, the system is working, so that's a plus. I'm slightly suspicious that God is multiplying my time... ya know, like He multiplied the 2 fish and 5 loaves of bread to feed 5,000+ people? Yeah. Definitely wouldn't put it past him. ;D

...becoming a pro at hand stitching (through a lot of layers of) faux leather, because my sad sewing machine pouts when I try to make it do the work for me. Pouts, as in, does weird things with the thread that makes a total mess and tons of seam ripping. It ain't cool. But, a little bit of sewing done by hand never hurt anyone, right? Just makes me appreciate more the times my machine does work. xD

...spending the least amount of time on the internet as my poor addicted self can handle, because every minute counts during the next FIVE DAYS. Yes, my peeps. Five days until Age of Ultron will be revealed in all it's glory to the general public. #so #not #emotionally #prepared

...my dad totally made this awesome little Avengers symbols out of foam for the shoulders of Cap. They turned out so nice, plus saved me the time/work of doing them myself. He also got me a buckle/hardware thing that will work perfectly for the shield holster (which is currently not in existence. yet.). Yeah, my dad is pretty cool. Same guy who dressed up as Gandalf to go to Battle of the Five Armies with me and my friends. :D


...a random awesome thing that kind of made my day, yesterday: on my blog's FB page, I got asked about costume commissions for the very first time in my cosplay career (or hobby, rather). Whether the inquiry amounts to anything doesn't matter much; just the fact that someone thought my work was good enough to ask if I would work for them makes me so pleased. ;D

Well, now that I've given you guys a little (long?) update, imma go feed my starving self -- currently living off ground turkey, frozen blueberries, and that sparkling water stuff. My Paleo equivalent of junk food, basically -- which isn't actually junk food, but... yeah. Plus anything my fam will cook for me. Hashtag "life of a cosplayer," because... ain't nobody got time fo cooking.

You can "look forward" to one last post devoted to Cap costume build before the 30th... might I remind you: FIVE. STINKING. DAYS. :D

Thursday, April 23, 2015

Captain America Cosplay - Guantlets, Back, Sleeves

Seeing as how we've got EIGHT DAYS until Age of Ultron, it's crunch time for my Cap costume. If you've followed me on Twitter, or liked meh blog on Facebook, you'll have already seen my freakout over my humongous to-do list for the costume...


Well, thank the Lord, I was able to get a ton finished today. And I'm back to thinking the costume looks pretty good. (Man, this is the most bipolar costume build I've done yet -- one day I'm loving it, next day it's a complete and utter failure... xD).

Because I'm need to be writing an essay instead of writing this right now, I'll just leave you with photos here on out. Enjoyyyy

Okay, I lied. Need a little explanation here. ;) New leather (malore faux leather from Fabric.com), for the guantlets, maybe gloves if I can actually make them, belt, and harness for the shield:


Gauntlets in progress (don't worry; they look weird now, but I've got a plan for them ;))


Then more progress on the bodice... zipper and part of the turtle neck, sewn to the new-and-improved back:


Worked on the sleeves for quite a while before deciding on adding red stripes around the shoulders, a la Cap's actual costume, and decided to forego the white stripes around the biceps all together, just because they make my skinny arms looks skinnier. And not in a good way: skinny as in non-muscular. It's just the feminine side of the costume coming through, I suppose... ;)

This mess is the sleeves in progress:


And what we're looking at now (except as of right now the sleeves are hemmed, shoulder stripes are sewed, and the ab stripes are sewn down as well):


Wheeeee much excite! Like I said: this thing is actually coming together. Run down of the current status: Bodice is ACTUALLY almost complete (the neckline just needs finishing), pants base is complete (now needs red accents down the side of the thigh and knee pads, both of which are already cut and ready to be sewn), guantlets need competing (leather sewn down, extra joining piece sewn and added), and harness, belt, and utility pouches are not currently a thing and still need to be created. Oh! And the "A" symbols on the shoulders need to be created (bought red + white foam for this today). Luckily, my dad has offered his help for anything he can do to get this costume finished, so that's awesome. The plan is to put him to work on the pouches and "A" emblems tomorrow. YAY for free labor! ;)

Sunday, April 12, 2015

A Sunday in Spring Circle Skirt + Tutorial


I'm kind of late hopping on the DIY circle skirt bandwagon, but... these skirts are my new favorite thing for alot of reasons: They're simple and quick to make, super customizable and versatile, and oh soooo pretty.

(Also, I chopped my hair off. Soooo whaddya think, whaddya think..? I kind of love it. :D)


I finally whipped a circle skirt up for myself last week, out of the fabric that I was originally going to use for making Arwen's coronation gown. I was becoming so depressed by seeing this gorgeous fabric going to waste, just sitting at the bottom of my fabric box for months and months... and since I have no plans in the near future for making that dress (even though it is beautiful, I don't really have a use for it anymore), I decided to finally cut into those yards of crepe back satin and make a 50s-inspired skirt.


Besides, that green color just screamed all things Spring, and I felt a major need to be wearing it. Because Spring is my favorite season -- weather, temperatures, and blooming flowers and trees. It perfectly represents new beginnings and God's beautiful creation.


But, enough talk; now for the tutorial so you can make a skirt for yourself! :)

1. First, fold a square of fabric in half twice, so you've got four quarters of fabric stacked on top of each other. The size of your square will determine your length, so keep this in mind when choosing your fabric width. Mine was 56" wide.

2. Next, using a tape measure, measure the same length from the double folded point of your fabric out to the edges, going around the circle and marking with a pencil or fabric marker as you go to create a curved line. Repeat this process for the waist, using this equation to find how large you need to make it: waist measurement / 3.14 / 2 = radius.


3. Now cut your waistband. Length: half of your waist measurement + 1 inch for a 1/2 inch seam. Width: 6 inches works well, but you can adjust this for a wider or smaller band. You'll fold this piece in half width-wise, so you don't have to make an extra seam at the top.

4. With right sides together, sew the waistband together to form a circle, then sew this (make sure it's folded over) to the skirt, also right sides together and with raw edges matching.

5. Next step (which can be omitted if you're using stretch fabric), cut part way down the back of the skirt and insert your zipper.


6. Finally, hem the skirt as desired, and you've got yourself a gorgeous new skirt to spin in! ;)

Monday, April 6, 2015

Captain America Cosplay - More Bodice and Pants

I hope you had an absolutely wonderful Easter weekend celebrating the most incredible, loving, grace-filled act in all of history: the suffering, death, burial, and resurrection of Jesus Christ, the son of God. But now that we must get back to school/work, I figured it would be a good time to give progress update #2 for my Cap fem cosplay! :)

ON TO THE COSTUME.

This is the bodice currently. The front is mostly sewn, and the back is mostly pinned (so any seams that look abnormally weird, don't worry: they're just not finished yet. They'll look better, I promise. ;)) As you can see, it needs the rest of the neckline pieces, the red embellishments around the star, the star-shaped panel behind the chest star, the actual chest star, the other two red waist stripes, and some other stuff I can't remember -- but you can just trust me that this bodice is still fairly far from complete, though it has already come a very long way. ;D


Le side... basically a mess of pins and confusing seams that I am DREADING to sew. I don't even have it pinned correctly yet. *cries because costume troubles*


The back. I'm hating how it looks currently, but it is far from complete as well, so that's one consolation. I honestly don't have much of a plan for it yet, but it'll [hopefully] look something like the back of the real costume. So it's currently a work in progress that's going to get revised. ;)


Here I've got the other stripes taped on (can't pin them since they're too thick and the pins would puncture the leather lining), plus a mock-up star that I whipped up from a paper template and aluminum foil (or should I say, aluminium? ;D). I was surprised by how nice it ended up turning out (hah!), so I've convinced myself to save some money instead of buying this $30 chest star from Cosplay Sky, which I completely fell in love with. The plan is to pick up a sheet of aluminum foil from Lowe's or something and make an improved version of this draft, just a bit smaller in width, height, and breadth.


And here is an extremely terribly looking plan for the bodice. The red lines are a very undeveloped WIP (literally just cut out), so those will be getting plenty of work, and I'm still working on the two waist stripes. I'm not 100% sure they look good. I think they're too wide, but I really really really want to avoid remaking them (they were a complete pain in le derriere), so I'm just going to have to see what becomes of them, I suppose. Laziness may win out. ;D


And now, the finale -- the pants! I'm very pleased with how these turned out (actually they're not quite finished; still need hemmed on both top and bottom). I was quite meticulous regarding the fit when making these (which meant way too many times of trying them on, plus a few scars from pins), since the fabric is stretch, meaning both too loose or too tight would completely ruin the look. As it is, I think I got it just right, and they work pretty perfectly with my Cap boots. ;) oh did I mention they're really comfortable too


Mooooore updates soon! Anyone else getting super-duper extremely excited for Avengers: Age of Ultron??? 7 pm on April 30th cannot come soon enough, in my opinion. Hehe.